
あなたは全身脱毛にこんな疑問を持っていませんか?
- 全身脱毛を安く体験できるのはどこ?
- 全身をツルツルにするにはいくらかかる?
- 全身脱毛するならサロンとクリニックどっちがいい?
この記事では全身脱毛を安くお試しできるキャンペーンの最新情報を紹介します。
また、脇や手足といった部分脱毛と比べて脱毛料金が高いイメージの全身脱毛ですが、実は複数の部分脱毛を行うより全身脱毛で契約する方が総額費用が安くなります。
記事の後半では、全身をツルツルにするまでにかかる回数と費用の比較、割引キャンペーンを利用して総額費用を抑える方法を解説します。


目次
1.全身脱毛をお試し体験できるキャンペーン

全身脱毛の体験キャンペーンがあるサロン・クリニックをまとめて紹介します。
1-1.全身脱毛のお試しを安く体験できる大手脱毛サロン一覧

1~2回だけ全身脱毛を格安でお試しできるキャンペーンがあるサロンを一覧にまとめました。
全身脱毛のお試しキャンペーンが安いサロン
| サロン | お試しできる部位・回数・料金 |
|---|---|
| おすすめ!ストラッシュ | 顔VIO含む全身脱毛1回:9,800円 詳しい情報はこちら>> |
| ミュゼ | 全身脱毛・顔脱毛・VIO脱毛2回、両ワキ+Vライン完了保証:200円 詳しい情報はこちら>> |
| 恋肌(こいはだ) | 顔VIO含む全身脱毛1回:12,000円 詳しい情報はこちら>> |
| ディオーネ | 60分全身脱毛し放題1回:16,500円 詳しい情報はこちら>> |
※価格は消費税10%込で表記しています。
次に、全身脱毛のキャンペーン内容を詳しく紹介します。
ストラッシュ

| キャンペーン内容 | 顔・VIOを含む全身脱毛 10ヶ月分0円 |
|---|---|
| 価格 | 月々2,900円~ |
| キャンペーンの申し込み方 | 1.「まずは無料カウンセリング」のボタンをクリック 2.店舗を選択 3.カレンダーから〇印が付いている時間を選択 4.お客様情報を入力 5.「上記に同意して確認へ進む」ボタンを押す 6.入力内容を確認し申込 |
北海道、東北
北海道:札幌店、宮城:仙台店
関東
東京:新宿西口店、銀座店、池袋東口店、渋谷中央店、町田店、立川店、上野店、西葛西店、聖蹟桜ヶ丘OPA店、神奈川:横浜西口店、藤沢店、武蔵小杉店、OSC湘南シティ店、千葉:千葉店、船橋南口店、柏店、埼玉:大宮西口店、川口店、栃木:小山店、茨城:BiViつくば店
中部
新潟:新潟店、愛知:名古屋栄店、名古屋駅前店、豊田店、一宮店、豊橋ミラまち店、刈谷店、静岡:静岡店、浜松店
関西
京都:京都店、大阪:梅田店、西梅田店、天王寺店、心斎橋店、堺東店、兵庫:三宮店、アリオ加古川店、奈良:奈良店
中国
広島:広島店、福山店、岡山:岡山店
九州、沖縄
福岡:福岡天神店、小倉店、熊本:熊本店、鹿児島:鹿児島店、沖縄:那覇アネックス店
ストラッシュでは、顔やVIOを含む全身脱毛を1回9,800円で体験できます。
今なら全身脱毛が10ヶ月分0円で通えるキャンペーンが実施されています。
最短2週間に1回通えるので、ハイスピードでお手入れできます。
格安で顔やVIO、うなじを含む全身脱毛を1回だけ体験してみたい人は、ストラッシュをチェックしておきましょう。
ストラッシュのキャンペーン情報へ
ミュゼプラチナム
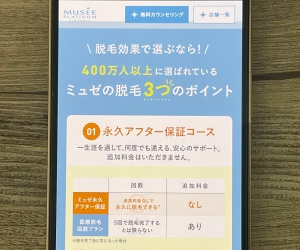 ミュゼプラチナム
| キャンペーン内容 | 全身脱毛・顔脱毛・VIO脱毛2回、両ワキ+Vライン完了保証 (美顔エステ2回付) |
|---|---|
| 価格 | 100円(税込) |
| キャンペーンの申し込み方 | 1.右上の「無料カウンセリング」ボタンをクリニック 2.カウンセリングを受ける店舗を選択 3.カレンダーから希望の日時を選択 4.お客様情報を入力 5.ご希望部位「全身」を選択 6.お申込みのきっかけになった広告「webバナー広告」を選択 7.個人情報のお取り扱いについて「同意する」にチェック 8.入力内容を確認し申込 |
北海道、東北
北海道:札幌ル・トロワ店、イオンモール旭川西店、札幌パルコ店、JR札幌駅前店、札幌琴似店、新札幌店、CAPO大谷地店、函館昭和タウンプラザ店、青森:グラン八戸店、秋田:グランイオンモール秋田店、岩手:盛岡MOSS店、宮城:グラン先代長町インター店、山形:グラン山形ナナ・ビーンズ店、福島:イトーヨーカドー福島店、白河店、郡山安積店、郡山ザ・モール店、会津若松店、いわきラトブ店
関東
東京:有楽町店、立川北口アネックス店、新宿西口アネックス店、池袋南口アネックス店、アリオ亀有店、渋谷公園通り店、日暮里店、錦糸町駅前店、上野広小路店、銀座並木通り店、池袋南口店、池袋東口店、池袋西口店、高田馬場店、新宿東口アネックス店、新宿三丁目店、恵比寿店、自由が丘南口店、吉祥寺店、吉祥寺駅前店、立川北口店、八王子オクトーレ店、町田駅前店、町田東急ツインズ店、神奈川:横浜西口エキニアアネックス店、グラン川崎ゼロゲート店、溝口ノクティプラザ店、新百合ヶ丘エルミロード店、横浜モザイクモール港北店、横浜ららぽーと店、上大岡ミオカ店、グランアリオ橋本店、藤沢店、Luz湘南辻堂店、千葉:柏東口駅前店、アクティオーレ市川店、ミーナ津田沼店、柏高島屋ステーションモール店、ビビット南船橋店、松戸店、千葉店、グランイオンタウン成田富里店、埼玉:南越谷駅前店、川口店、大宮西口駅前店、グラン大宮店、大宮ステラタウン店、浦和店、ららぽーと富士見店、丸広百貨店上尾店、所沢店、川越店、イトーヨーカドー春日部店、熊谷ニットーモール店、茨城:イオンタウン水戸南店、イオンモールつくば店、つくばイーアス店、栃木:宇都宮インターパークスタジアム店、宇都宮駅前店、群馬:太田イオンモール店、伊勢崎スマーク店、ガーデン前橋店
中部
新潟:新潟万台シティ店、新潟上近江店、長野:ながの東急百貨店、松本パルコ店、山梨:イオンタウン山梨中央店、静岡:セントラルスクエア静岡店、遠鉄百貨店、イオン浜松西店、新静岡駅前店、石川:香林坊東急スクエア店、岐阜:グランMEGAドン・キホーテUNY岐阜店、モレラ岐阜店、富山:富山CiC店、愛知:イオンモール東浦店、アピタ名古屋北店、グラン栄店、金山店、近鉄パッセ店、デリスクエア今池店、イトーヨーカドー安城店、三重:イオンモール鈴鹿店、福井:アピタ福井大和田店
関西
滋賀:フォレオ大津一里山店、京都:京都堺町通り店、京都河原町店、京都四条通り店、MOMOテラス店、奈良:イオンモール奈良登美ヶ丘店、近鉄ならら店、大阪:イオンモール大日店、梅田駅前店、グランNU茶屋町店、京橋駅前店、グラン西梅田店、なんばCITY店、なんばパークスタワー店、近鉄難波駅前店、グラン天王寺アポロビル店、あべのキューズモール店、アリオ鳳店、兵庫:グラン三宮店、姫路店、神戸ハーバーランドumie店、アウピア明石店、和歌山:イオンモール和歌山店
中国、四国
岡山:岡山駅前店、アリオ倉敷店、島根:出雲ゆめタウン店、広島:イオンモール広島府中店、広島アルパーク店、東広島ゆめタウン店、鳥取:鳥取トリニティモール店、山口:イオン防府店、大丸下関店、徳島:徳島アミコ店、香川:高松ゆめタウン店、丸亀ゆめタウン店、高知:高知イオンモール店、愛媛:松山店
九州、沖縄
福岡:イオンモール香椎浜店、JR博多駅前店、グラン天神西通り店、西新テングッドシティ店、グラン直方店、筑紫野ゆめタウン店、リバーウォーク北九州店、佐賀:モラージュ佐賀店、長崎:みらい長崎ココウォーク店、大分:大分駅前店、大分パークプレイス店、熊本:熊本アウネ店、光の森ゆめタウン店、宮崎:宮崎宮交シティ店、鹿児島:グラン鹿児島店、沖縄:那覇新都心店
たった100円で全身脱毛を2回も体験できるミュゼ。
両脇とVラインの脱毛は、一生涯通い放題なので、ツルツルになるまでお手入れを行えます。
さらにキャンペーンページに「75%OFF」の表示が出た場合、平日17時までに来店すれば、25円で全身脱毛を2回も試せます。
全身脱毛のお試し体験のついでに脇やVラインの脱毛を完了したい人は、ミュゼのキャンペーンをチェックしておきましょう。
ミュゼのキャンペーン情報へ
恋肌(こいはだ)
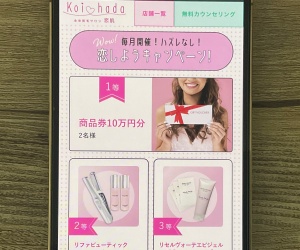 恋肌(こいはだ)
| キャンペーン内容 | 顔・VIOを含む全身脱毛1回 |
|---|---|
| 価格 | 12,000円(税込) |
| キャンペーンの申し込み方 | 1.右上の「無料カウンセリング」をタップ 2.カウンセリングを受ける人数と希望の店舗を選択 3.カレンダーから希望の日時を選択 4.お客様情報を入力し「確認画面へ」をタップ 5.入力内容を確認して申し込む |
北海道、東北
北海道:札幌駅前店、札幌駅前2号店、青森:キレミカ青森店、キレミカ八戸店、岩手:キレミカ盛岡店、宮城:仙台店、キレミカ名取店、秋田:キレミカ秋田店、福島:郡山店、キレミカいわき店、キレミカ会津若松店
関東
東京:新宿南口店、新宿西口店、渋谷神南店、原宿表参道店、銀座店、池袋東口店、池袋西口店、恵比寿店、自由が丘店、吉祥寺店、立川駅前南口店、上野店、町田店、八王子店、キレミカ亀戸店、キレミカ練馬駅前店、神奈川:湘南藤沢店、横浜西口プレミアム店、川崎店、キレミカ小田原栢山店、キレミカ小田原駅前店、キレミカ秦野店、千葉:千葉店、柏店、キレミカ東船橋駅前店、キレミカ佐倉店、キレミカ木更津店、キレミカ成田店、埼玉:大宮店、熊谷店、川越店、キレミカ越谷店、栃木:宇都宮店、群馬:高崎店、茨城:キレミカつくば学園の森店、キレミカ水戸店、キレミカつくば東店、キレミカ日立店
中部
愛知:名古屋栄店、名古屋駅前店、名古屋駅前プレミアム店、豊田店、岡崎店、豊橋店、キレミカ春日井川勝店、キレミカ江南店、静岡:静岡店、浜松店、キレミカ沼津店、キレミカ沼津プリモ店、キレミカ御殿場店、岐阜:岐阜店、三重:四日市店、石川:金沢駅前店、新潟:新潟店、キレミカ上越高田店
関西
大阪:梅田プレミアム店、梅田茶屋町店、心斎橋店、なんば店、天王寺店、堺東駅前店、キレミカ貝塚店、キレミカ貝塚プレミアム店、キレミカ和泉店、京都:河原町店、四条烏丸店、兵庫:神戸三宮店、三宮プレミアム店、キレミカ西宮店、滋賀:キレミカ彦根店
中国、四国
岡山:岡山駅前店、広島:広島店、福山店、山口:キレミカ山口店、キレミカ下関店、キレミカ徳山店、キレミカ宇部店、島根:松江店、香川:キレミカ丸亀店、愛媛:松山店、高知:高知店
九州、沖縄
福岡:福岡天神店、博多駅前店、香椎駅前店、春日原店、小倉駅前店、キレミカ柳川店、佐賀:キレミカ佐賀駅前店、長崎:長崎店、佐世保店、熊本:熊本下通店、キレミカ荒尾店、キレミカ八代店、大分:大分駅前店、明野店、宮崎:宮崎店、キレミカ延岡店、鹿児島:鹿児島天文館店、鹿児島プレミアム店、キレミカ鹿屋店、沖縄:キレミカ那覇おもろまち店
恋肌(こいはだ)は、自己処理が不要になるまでの総額が最も安いサロンです。
体験後も安く通いたい人は、恋肌(こいはだ)で全身脱毛を始めましょう。
恋肌(こいはだ)のキャンペーン情報へ
ディオーネ

| キャンペーン内容 | 60分間全身の好きな部位を脱毛し放題1回 (対象箇所はVIOを含む首から下の全身) |
|---|---|
| 価格 | 16,500円(税込) |
| キャンペーンの申し込み方 | 1.「今すぐ脱毛体験をする」のボタンをクリック 2.ご希望の地域・サロンを選択 3.ご希望時間を選択 4.お客様情報を入力 5.「上記に同意する」にチェックを入れる 6.利用規約に同意して次へ進む 7.入力内容を確認し申込 |
北海道、東北
北海道:札幌駅前店、千歳店、青森:八戸店、宮城:仙台店、秋田:秋田駅東口店、福島:会津若松店、須賀川店
関東
東京:新宿本店 Premium、青山店 Premium、銀座本店、高田馬場店、上野不忍通り店、錦糸町店、自由が丘店、渋谷店、恵比寿駅前店、池袋東口店、六本木店、麻布十番店、北千住店、吉祥寺店、国分寺駅前店、立川店、神奈川:横浜駅西口店、横浜関内店、横浜駅鶴屋町店、川崎店、武蔵小杉駅前店、溝の口店、湘南藤沢店、中央林間店、海老名店、千葉:千葉店、西船橋駅前店、松戸店、成田店、柏店、八千代店、埼玉:大宮店、さいたま店、川越店、南越谷駅前店、深谷店、朝霞台店、栃木:宇都宮店、茨城:つくば店、群馬:群馬伊勢崎店
中部
新潟:新潟けやき通り店、上越鴨島店、石川:金沢店、長野:長野東口店、飯田店、静岡:浜松駅前店、浜松有玉店、藤枝店、御殿場店、三島店、愛知:名古屋本山店、名古屋駅前店、金山駅前店、栄店、豊橋店、岡崎店、一宮店、安城住吉店、東海店、大府店、岐阜:多治見店、岐阜店、美濃加茂店、三重:四日市駅前店、三重鈴鹿店
関西
大阪:心斎橋店 Premium、天王寺店、梅田店、北浜店、岸和田店、泉佐野店、東大阪八戸ノ里駅前店、茨木本店、京都:京都河原町店、四条烏丸店、兵庫:垂水駅前店、神戸三宮店、尼崎店、東加古川店、滋賀:草津店、大津駅前店、和歌山:和歌山店、和歌山けやき大通り店
中国、四国
広島:広島紙屋町店、山口:山口店、香川:高松サンフラワー通り店、宇多津店
九州
福岡:朝倉店、長崎:長崎葉山店、宮崎:都城店、鹿児島:鹿児島鹿屋店
痛みが少なく美肌効果が高い独自の脱毛法を採用しているディオーネ。
全身脱毛のキャンペーンを利用すれば、全身の好きな部位を60分間お手入れしてもらえます。
脱毛と同時に美肌になりたい人や全身脱毛の痛みが心配な人は、ディオーネのキャンペーンをチェックしてみてください。
ディオーネのキャンペーン情報へ
1-2.全身脱毛のお試しを安く体験できる脱毛クリニック一覧

クリニックにはサロンのようなお試しキャンペーンはありませんが、1回コースを利用すれば全身脱毛を体験してみることができます。
全身脱毛の1回料金が安いクリニックについては以下の表をご覧ください。
全身脱毛(顔VIO除く)を1回だけ安くお試し体験できるクリニック
| クリニック | 全身脱毛(顔VIO除く)1回の料金 |
|---|---|
| おすすめ!渋谷美容外科クリニック | 19,800円 |
| ジュエルクリニック | 19,800円 |
| 湘南美容クリニック | 50,720円 |
| フレイアクリニック | 72,600円 |
| 平均 | 77,045円 |
| カルミア美肌クリニック | 77,550円 |
| リゼクリニック | 81,800円 |
| 聖心美容クリニック | 86,900円 |
| アイエスクリニック | 91,740円 |
| レジーナクリニック | 192,500円 |
※価格は消費税10%込で表記しています。
全身脱毛(顔VIO含む)を1回だけ安くお試し体験できるクリニック
| クリニック | 全身脱毛(顔VIO含む)1回の料金 |
|---|---|
| おすすめ!ジュエルクリニック | 39,800円 |
| 湘南美容クリニック | 60,900円 |
| カルミア美肌クリニック | 85,800円 |
| リゼクリニック | 119,800円 |
| 平均 | 123,978円 |
| アイエスクリニック | 127,050円 |
| フレイアクリニック | 156,200円 |
| レジーナクリニック | 278,300円 |
※価格は消費税10%込で表記しています。
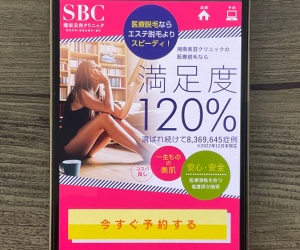
では全身脱毛を安く体験できる渋谷美容外科クリニック、新宿美容外科クリニック、湘南美容クリニックについて詳しく紹介します。
渋谷美容外科クリニック
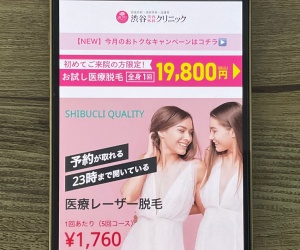 渋谷美容外科クリニック
| 部位・回数 | 顔・VIOを除く全身脱毛1回 |
|---|---|
| 価格 | 19,800円(税込) |
| 申し込み方 | 1.ページ下部の「WEB予約」をタップ 2.希望の医院と日時を選択 3.名前と年齢を入力 4.連絡先と連絡方法を入力 5.相談内容で「全身脱毛19,800円」にチェックを入れる 6.送信をタップ 7.入力内容を確認し送信をタップして申し込む |
関東
東京:新橋院、渋谷院、新宿院、池袋院、神奈川:横浜院
渋谷美容外科クリニックでは、全身の医療脱毛を最安値で体験できます。
アレキサンドライトレーザーを使用するため、太い毛にも効果が高く、美肌効果を期待できるのもメリットの一つです。
渋谷美容外科クリニックのキャンペーン情報
ジュエルクリニック
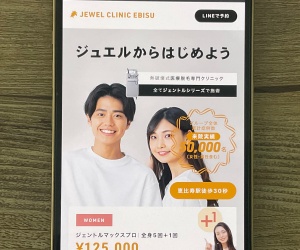 ジュエルクリニック
| 部位・回数 | ①全身(顔VIO除く)1回 ②全身+VIOor顔1回 ③全身+VIO・顔1回 |
|---|---|
| 価格 | ①19,800円 ②29,800円 ③39,800円 |
| 申し込み方 | 1.「無料カウンセリングご予約はこちら」をタップ 2.希望の日時を選択 3.お客様情報を入力 4.送信確認にチェックを入れて「送信」をタップ 5.入力内容を確認して申し込む |
関東
東京:恵比寿
ジュエルクリニックでは、顔やVIOを含む全身脱毛を最安値で体験できます。
顔もVIOもまとめて安く脱毛したい人は、ジュエルクリニックの体験プランをチェックしておきましょう。
トライアルプランも豊富で、次の3つから選べます。
【全身トライアル1回】
-
①顔・VIOを除く全身脱毛1回
②顔・VIOを含む全身脱毛1回
②全身+VIOor顔1回
③全身+VIO・顔1回
-
①19,800円
②29,800円
③39,800円
顔やVIOを除く全身脱毛のトライアルプランは、先着20名限定なので早めに申し込んでおきましょう。
ジュエルクリニックのキャンペーン情報へ
湘南美容クリニック
 湘南美容クリニック
| 部位・回数 | ①顔・VIOを除く全身脱毛1回 ②顔・VIOを含む全身脱毛1回 |
|---|---|
| 価格 | ①50,720円(税込) ②60,900円(税込) |
| 申し込み方 | 1.「いますぐ予約する」のボタンをクリック 2.予約フォームにプロフィールを入力 3.ご希望のエリア・クリニック・希望日を選択 4.ご希望のコース・部位で「パーフェクト全身脱毛」を選択 5.当日の施術希望を選択 6.メール配信希望を選択 7.「送信内容確認」ボタンを押す 8.入力内容を確認し申込 |
北海道、東北
北海道:札幌院、宮城:仙台院、福島:福島院
関東
東京:新宿院、新宿南口院、レーザー新宿大ガード院、渋谷院、渋谷アネックス院、表参道院、六本木院、池袋東口院、池袋西口院、赤坂見附院、高田馬場院、銀座院、新橋銀座口院、品川院、秋葉原院、上野院、湘南メディカル記念病院、西葛西院、東京蒲田院、自由が丘院、二子玉川院、赤羽院、立川院、町田院、八王子院、湘南内科皮フ科クリニック町田院、神奈川:横浜院、横浜東口院、川崎院、武蔵小杉院、橋本院、藤沢院、横須賀中央院、辻堂アカデミア院、埼玉:大宮東口院、川口院、所沢院、川越院、千葉:千葉センシティ院、船橋院、松戸院、柏院、高崎院、宇都宮院、水戸院
中部
愛知:名古屋院、名古屋栄院、金山院、静岡:浜松院、静岡院、新潟:新潟院、石川:金沢院、長野:長野院、岐阜:岐阜院
関西
京都:京都院、京都河原町院、大阪:大阪梅田院、大阪駅前院、大阪心斎橋院、大阪なんば院、大阪あべの院、大阪京橋院、大阪堺東院、兵庫:神戸院、姫路院、西宮北口院、奈良:奈良院
中国、四国
広島:広島院、岡山:岡山院、香川:高松院、愛媛:松山院
九州、沖縄
福岡:福岡院、小倉院、熊本:熊本院、宮崎:宮崎院、鹿児島:鹿児島院、沖縄:那覇院
湘南美容クリニックは、全国に100院以上あるため、どこに住んでいても気軽に全身脱毛を体験できます。
予約フォームで「パーフェクト全身脱毛」を選択し、補足欄に1回体験希望と記入すれば簡単に申し込めます。
安くて通いやすいクリニックで全身脱毛を体験してみたい人は、湘南美容クリニックをチェックしておきましょう。
湘南美容クリニックのキャンペーン情報
2.全身脱毛のお試し体験のはしごで全身ツルツルになる?
効果を実感できるまで格安で全身脱毛に通いたい人は、お試し体験をはしごするのがおすすめです。
2-1.脱毛サロンのお試し体験を使ったはしごプラン
サロンをはしごすれば、全身脱毛を5回も体験することができます。
脱毛サロンのお試し体験を使った全身脱毛のはしごプラン
| サロン | 体験できる部位 | 回数・料金 |
|---|---|---|
| ストラッシュ | 全身(うなじ含む)+顔+VIO | 1回8,800円 |
| ミュゼ | 全身(うなじ除く)+顔+VIO | 2回100円 |
| 恋肌(こいはだ) | 全身(うなじ含む)+顔+VIO | 1回12,000円 |
| ディオーネ | 60分全身脱毛し放題 | 1回16,500円 |
| 合計 | 全身脱毛+顔+VIO | 5回37,400円 |
※価格は税込で表示しています。
5回37,400円なので、1回あたり7,480円で顔やVIOを含む全身脱毛を行える計算になります。
またミュゼのお試し体験には、両脇Vラインの永久アフター保証が付いているため、両脇とVラインは満足するまで何度でも脱毛できます。
2-2.はしごではツルツルにならないのでどのサロンに通うかの判断材料にしよう
サロンをはしごして全身脱毛を5回体験すると、全体的に毛量が減り、脱毛効果を実感できます。
しかしツルツルになるまでには15回以上かかるため、お試し体験をはしごしても、ツルツルにはなりません。
全身脱毛の効果と回数の目安
| 回数 | 全身脱毛の効果 |
|---|---|
| 6回 | 全体的に毛量が減り 脱毛効果を実感できる |
| 10回 | 自己処理の回数が減る |
| 12回 | 自己処理がほぼ不要になる |
| 15回以上 | ツルツルになる |
全身脱毛のお試し体験は、サロンに通うかどうかの判断材料として活用するのがおすすめです。
自分に合うサロンが見つかったら、理想の状態になるまで続けて通いましょう。
3.全身脱毛のお試し体験のメリット
全身脱毛のお試し体験のメリットは次の5つです。
- お試し価格で安く全身脱毛の施術ができる
- 全部位の痛みを確認できる
- 3部位以上なら部分脱毛より安く体験できる
- 部分脱毛のお試し体験と違って境目が目立たない
- サロンの雰囲気やスタッフの対応をゆっくり比較できる
では5つのメリットについて、それぞれ詳しく紹介します。
3-1.お試し価格で安く全身脱毛ができる
サロンのお試しキャンペーンを利用すれば、通常コースの半額で全身脱毛を体験できます。
全身脱毛を通常の半額で試せるサロン
| サロン | 通常1回 | お試し体験 |
|---|---|---|
| ストラッシュ | 顔VIO含む全身 1回17,600円 |
顔VIO含む全身 1回8,800円 |
| ミュゼ | 顔除く全身 1回92,820円 |
顔VIO含む全身 2回100円 |
| ディオーネ | 顔除く全身 1回33,000円 |
60分全身脱毛し放題 1回16,500円 |
※価格は税込で表示しています。
クリニックでも1回コースを利用すれば全身脱毛を体験できますが、通常コースなので1回19,800円(税込)もかかります。
格安で全身脱毛を体験したい人は、サロンのお試しキャンペーンを利用するのがおすすめです。
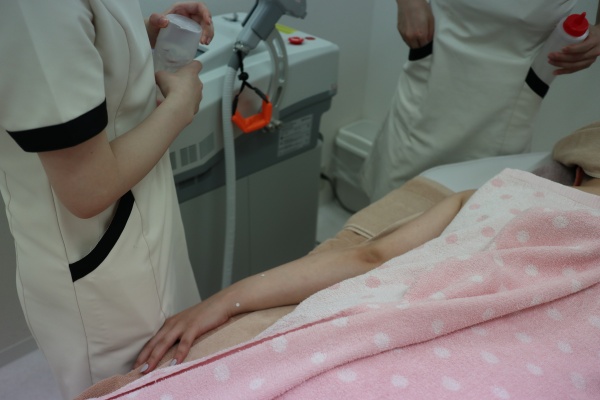
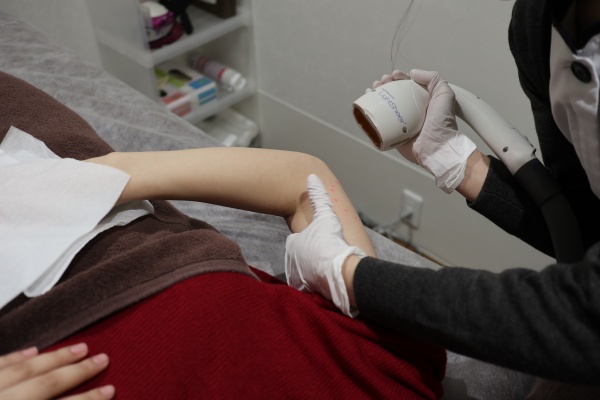
3-2.全部位の痛みを確認できる
お試し体験で全部位の痛みを確認してから全身脱毛を始めれば、途中で痛くて通えなくなることもありません。
特に痛みが強いとされているのは次の3部位です。
- デリケートゾーン(VIO)
- 脇
- 顔(鼻の下)
コース契約をしてから痛みに耐えられず挫折すると、解約手数料がかかってしまいます。
痛みの強さは、脱毛法や脱毛器の種類によって大きく異なるので、体験してから続けて通えそうなところで全身脱毛を始めましょう。
3-3.3部位以上なら部分脱毛より安く体験できる
脇・顔・VIOの部分脱毛を体験すると合計で1回9,800円かかりますが、ストラッシュなら1回8,800円で顔やVIOを含む全身脱毛を体験できます。
- TBC:両脇脱毛1回1,000円
ディオーネ:顔脱毛1回3,300円
プリート:VIO脱毛1回5,500円
また、お試し体験は1人1回しか利用できないので、部分脱毛の場合、脇はAサロン、VIOはBサロン…と部位ごとにサロンを変える必要があります。
体験前にはサロンごとにカウンセリングを受けなければならないので、部分脱毛を選ぶとカウンセリングにかかる時間も倍増してしまいます。
3部位のお試し体験:サロンごとに3回のカウンセリングが必要
全身脱毛のお試し体験:1回のカウンセリングでOK
3部位以上脱毛したい人は、部分脱毛ではなく全身脱毛を体験するのがおすすめです。
3-4.部分脱毛のお試し体験と違って境目が目立たない
部分脱毛を体験すると、脱毛した部位と脱毛していない部位の境目が目立ってしまいます。
一方、全身脱毛のお試し体験なら、全身をくまなく脱毛できるため、綺麗に仕上がるのもメリットの一つです。
3-5.サロンの雰囲気やスタッフの対応をゆっくり比較できる
全身脱毛を体験をすれば、全部位の施術の流れがわかります。
また施術時間も部分脱毛に比べて長いため、次のような点をゆっくり確認することができます。
- 施術中の体勢
- 声かけなどのスタッフの対応
- 店内の清潔感
- スタッフとの相性
全身脱毛は1回で完了しないので、気持ちよく通えるサロンを選ぶことも重要です。
サロンの雰囲気やスタッフの対応を比較して、自分に合うサロンを見つけましょう。
4.全身脱毛のお試し体験のデメリット
全身脱毛のお試し体験には、次の5つのデメリットがあります。
- 全身脱毛のお試し体験をはしごしても全身ツルツルにならない
- お試し体験が安くても通常コースも安いとは限らない
- 体験前には必ずカウンセリングを受ける必要がある
- サロンによっては全身1回の脱毛を体験するのに4回通う必要がある
- 部分脱毛のお試し体験に比べて時間も費用もかかる
デメリットだけでなく、対策もまとめておくので、ぜひ参考にしてください。
4-1.全身脱毛のお試し体験をはしごしても全身ツルツルにならない
全身脱毛のお試し体験をはしごしても、回数が足りたいため、全身ツルツルにはなりません。
- 全身脱毛のお試し体験ができる回数:5回
全身ツルツルになるまでの回数:15回以上
また初回は低出力で照射を行うサロンやクリニックが多いため、1つのところに継続して通った方が早く全身ツルツルを目指せます。
お試し体験はあくまで、サロンやクリニックを比較するために活用しましょう。
4-2.お試し体験が安くても通常コースも安いとは限らない
お試し体験の料金が安いからといって、通常コースの料金も安いとは限りません。
お試し体験と通常コースの料金比較
| サロン | お試し体験の料金 | 通常コースの料金 |
|---|---|---|
| ストラッシュ | 1回8,800円 | 6回125,400 円 |
| ミュゼ | 2回100円 | 6回164,072円 |
※価格は税込で表示しています。
自己処理が不要になるまでには、サロンなら12回、クリニックなら5回はかかります。
費用を安く抑えたい人は、完了までの総額を比較して安いサロンやクリニックを選びましょう。
4-3.体験前には必ずカウンセリングを受ける必要がある
全身脱毛を体験する前には、必ずカウンセリング受ける必要があります。
5つのサロンで全身脱毛を体験する場合、カウンセリングも5回も受けなければなりません。
カウンセリングにかかる時間は約60分なので、5回で5時間もかかってしまいます。
またカウンセリング当日には施術を受けられないサロンがほとんどなので、カウンセリングと施術で2回の来店が必要になります。
お試し体験をはしごする予定の人は、カウンセリングの手間も含めて、何回体験するかを決めましょう。
4-4.サロンによっては全身1回の脱毛を体験するのに4回通う必要がある
ストラッシュの月額プランは、次のように全身を1/4ずつに分けて照射を行う仕組みになっているため、全身脱毛を1回体験するのに4回通う必要があります。
- うなじ、背中上、ヒップ
- 胸、お腹、VIO
- ヒザ上下、足甲指
- 顔、ヒジ上下、手甲指
通うペースは自由なので、1ヶ月に4回来店してもOKです。
4回に分けて施術を行うため、1回あたりの施術は20~30分ほどの短時間で完了します。
一方、恋肌(こいはだ)は、1回の来店で全身脱毛を体験できますが、顔やVIOを含む全身脱毛の場合、90~100分ほどかかります。
1回で全身をまとめて脱毛したい人は恋肌(こいはだ)、1回あたりの施術時間を短縮したい人はストラッシュで全身脱毛を体験しましょう。
4-5.部分脱毛のお試し体験に比べて時間も費用もかかる
全身脱毛のお試し体験は、部分脱毛と比べて料金も高く、施術時間も長くなります。
部分脱毛と全身脱毛のお試し体験の料金比較
| サロン | お試しできる部位・回数 | 料金 |
|---|---|---|
| ジェイエステ | 両脇脱毛12回+5年間無料保証 | 45円 |
| ストラッシュ | 顔・VIOを含む全身脱毛1回 | 8,800円 |
※価格は税込で表示しています。
全身脱毛の施術には1時間半~2時間かかりますが、脇だけなら10分ほどで完了します。
部位を絞って安く早く脱毛を体験したい人は、ジェイエステのキャンペーンをチェックしておきましょう。
5.脱毛のお試し体験ができるメンズサロン
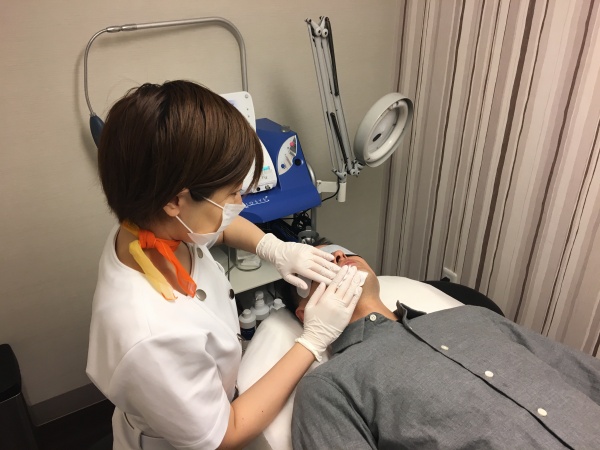
メンズ脱毛サロンでも、1,000円ほどで脱毛を体験できるキャンペーンが複数実施されています。
脱毛のお試し体験ができるメンズサロン
| サロン | お試しできる部位・回数・料金 |
|---|---|
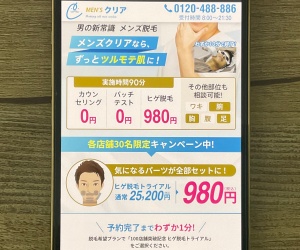
| メンズクリア | ヒゲ全体1回:980円 |
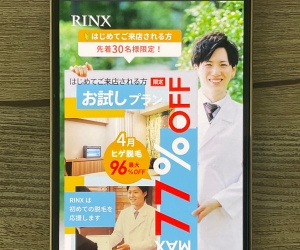
| リンクス | ヒゲ1部位1回:1,800円 ヒゲ1部位3回:4,800円 ヒゲ全体1回:900円 |
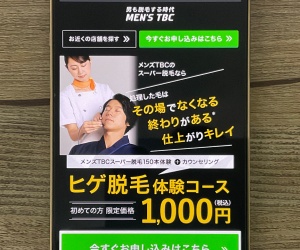
| メンズTBC | 好きな部位の美容電気脱毛150本:1,000円 |
※価格は税込で表示しています。
3つのサロンのキャンペーンについて、それぞれ詳しく紹介します。
メンズクリア
| お試しできる部位・回数 | ヒゲ全体1回 |
|---|---|
| 価格 | 980円(税込) |
| キャンペーンの申し込み方 | 1.「980円(税込)トライアルで今すぐ予約」をクリック 2.お客様情報を入力 3.希望店舗を選択 4.脱毛希望プランを選択 5.来店希望日と時間を選択 6.注意事項を読んで同意するをチェックし送信 7.入力内容を確認して申し込む |
メンズクリアでは、980円でヒゲ全体の脱毛を体験できるキャンペーンが実施されています。
また全身から好きな1部位を選んで、980円で脱毛を体験することもできます。
さらに全身脱毛の2年通い放題プランを契約すると、Amazonギフト券と家庭用脱毛器を無料でプレゼントしてもらえます。
- Amazonギフト券30,000円分
- 家庭用脱毛器「HOME CLEAR」119,520円相当
メンズクリアでは最新のハイブリッド脱毛機が使用されているため、痛みも少なく1回10分でヒゲ脱毛の施術が完了します。
店舗数も業界NO.1で、全国に110店舗以上を展開しているので、まずは近くの店舗で気軽にヒゲ脱毛を体験してみましょう。
リンクス
 リンクス
リンクス| お試しできる部位・回数 | ①ヒゲ1部位1回 ②ヒゲ1部位3回 ③ヒゲ全体1回 |
|---|---|
| 価格 | ①1,800円(税込) ②4,800円(税込) ③900円(税込) |
| キャンペーンの申し込み方 | 1.「ご予約・お問い合わせ」をクリック 2.お客様情報を入力 3.顔・ヒゲの脱毛部位から希望の部位を選択 4.希望の店舗や日時を選択 5.個人情報の取り扱いに同意するにチェック 6.入力内容を確認して申し込む |
リンクスにはヒゲ脱毛のお試しプランが3種類あります。
最もお得なのは、900円でヒゲ全体の脱毛を体験できるプランです。
こちらのプランは毎月先着30名限定なので、早めに申し込んでおくのがおすすめです。
また通常の半額で、全身の好きな部位の脱毛を体験することもできます。
例えば、ひじ下なら1回6,300円(税込)、ひざ下なら1回7,900円(税込)、陰部は1部位1回7,350円(税込)で試せます。
男性スタッフに問い合わせから施術までを任せたい人は、リンクスで脱毛を体験してみるのがおすすめです。
メンズTBC
| お試しできる部位・回数 | 好きな部位の美容電気脱毛150本 |
|---|---|
| 価格 | 1,000円(税込) |
| キャンペーンの申し込み方 | 1.「ネットで予約する」をクリック 2.ご希望のサービスで「脱毛」を選択 3.ご希望コースでヒゲ脱毛orカラダ脱毛を選択 4.カラダ脱毛の場合は希望の部位を選択 5.希望の都道府県とサロンを選択 6.カレンダーから希望の日時を選択 7.「注意事項を確認しました」にチェック 8.お客様情報を入力 9.「注意事項を確認しました」にチェック 10.利用規約と個人情報保護方針に同意するにチェック 11.入力内容を確認して申し込む |
メンズTBCには、1,000円で美容電気脱毛を体験できる2つのコースがあります。
- ヒゲ脱毛体験コース
- カラダ脱毛体験コース
カラダ脱毛体験コースの場合、全身10部位から好きな部位を選べます。
対象部位は以下の通りです。
- 胸、腹、手の甲指、太もも、ひざ下、背中、脇、ひじ上、ひじ下、足の甲指
美容電気脱毛は、その場で毛が抜けて、半永久的に生えてこなくなる効果が高い脱毛法です。
体験だけで効果を実感したい人は、メンズTBCの美容電気脱毛を試してみましょう。
6.全身脱毛のお試し体験のよくある質問
全身脱毛のお試し体験に関するよくある質問をまとめて紹介します。
6-1.全身脱毛のお試しは痛いですか。
全身脱毛のお試しで痛みを感じやすい部位は、VIO・脇・鼻下の3つです。
太い毛が生えている部位ほど痛みを感じやすい傾向があるため、産毛が多い腕や背中は痛みの心配がほとんどありません。
また全身脱毛の痛みは、脱毛法によっても以下のように異なります。
全身脱毛の痛みと脱毛法
| 脱毛法 | 全身脱毛の痛み |
|---|---|
| 光脱毛 | 最も痛みが少ない脱毛法 |
| 医療脱毛 | 痛みはあるが麻酔で軽減できる |
| 美容電気脱毛 | 痛みが強い |
痛みが苦手な人は、光脱毛ができるサロンで全身脱毛を体験してみましょう。
6-2.全身脱毛のお試しはどれくらい時間がかかりますか。
顔やVIOを含む全身脱毛の施術時間は、90~120分ほどになります。
2時間も予定を空けるのが難しいという人は、ストラッシュで全身脱毛を体験するのがおすすめです。
ストラッシュでは、全身の1/4ずつ照射を行うため、1回あたり20~30分で施術が完了します。
通うペースは自由なので、週1回のペースで4回来店すれば、1ヶ月で全身1回分の脱毛を体験できます。
6-3.全身脱毛のお試しだけでツルツルになりますか。
サロンのお試し体験をはしごしても5回しか全身脱毛を行えないため、お試しだけでツルツルにはなりません。
全身ツルツルになるまでには、サロンなら15回以上、クリニックなら8回以上はかかります。
そのためツルツルを目指すなら、体験後も続けて通う必要があります。
5回でも「全体的に毛量が減る」といった効果を実感できるので、まずは実際に全身脱毛を体験してみましょう。
6-4.全身脱毛のお試しはどうしてこんなに安いんですか。
全身脱毛のお試しが安い理由は、「新規の人に気軽に体験してもらって、顧客を増やしたい」とサロンが考えているからです。
お試し体験で満足した人が多ければ多いほど、顧客を増やすことができるため、安くても丁寧に施術をしてもらえます。
また大手脱毛サロンは悪い評判が広がるのを避けたいと考えているため、勧誘されることもほとんどありません。
勧誘が心配な人は、公式サイトで「勧誘しない」と宣言をしている大手脱毛サロンで全身脱毛を体験してみるのがおすすめです。

- 【2200円〜】VIO脱毛をお試し体験できるキャンペーン
- 【2200円〜】顔脱毛をお試し体験できるキャンペーン情報
- 【330円で完了】ワキ脱毛をお試し体験できるキャンペーン
- 【330円〜】足・ひざ下脱毛をお試し体験できるキャンペーン
- ひじ下・ひじ上・腕脱毛をお試し体験できるキャンペーン
- 全身脱毛をお試し体験できるキャンペーン一覧